
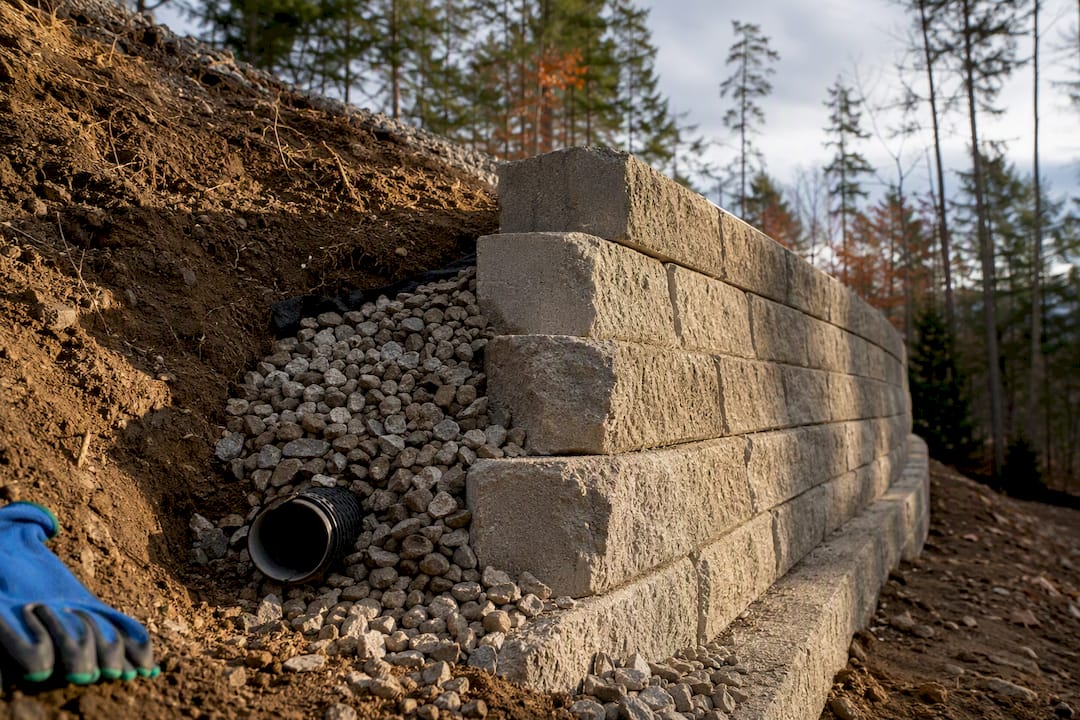
A continuous porous drain zone with a 4-inch perforated pipe sloped to daylight is the single most important element of a retaining wall drainage system. That combination, paired with filter fabric and a working outlet, is what keeps hydrostatic pressure from building up behind the wall. Any retaining wall over about 2 to 3 feet, or built in clay or poorly draining soil, needs this system. Everything else, weep holes included, is backup.
TL;DR:
- Proper drainage systems require a minimum 12-inch wide stone zone of angular crushed stone behind the wall to allow water to flow freely and prevent pressure buildup.
- A 4-inch perforated pipe with downward-facing perforations, sloped at at least 1 percent toward an outlet, is essential for effective water removal, especially in taller walls.
- Filter fabric must wrap the entire stone zone to prevent soil fines from clogging the drainage system, which is critical for long-term performance.
- Daylighted outlets or visible, unobstructed drainage points are vital, and additional outlets are recommended every 50 feet for long or complex systems.
- Surface grading away from the wall and properly managed downspouts significantly reduce surface water infiltration, complementing subsurface drainage efforts.
Table of Contents
- What Is Retaining Wall Drainage, and Why Does It Matter?
- Homeowner Quick Checklist Before You Sign a Contract
- Drainage Components Explained: Stone Zone, Pipe, Fabric, and Weep Holes
- How to Choose Pipe, Stone, Fabric, and Accessories
- How to Install Drainage Behind a New Retaining Wall
- Managing Surface Water Above the Wall
- Retrofitting Existing Walls Without Undermining Them
- Common Drainage Mistakes and How to Avoid Them
- Seasonal Maintenance and Inspection Checklist
- What We See in the Field at Divine Landscaping
- Why Drainage Comes Before Anything Else on a Wall Project
- How Drainage Is Handled, From Inspection to Full Installation
- Sources
What Is Retaining Wall Drainage, and Why Does It Matter?
Retaining wall drainage is the engineered path that moves groundwater and infiltrating rainwater away from the soil a wall is holding back, instead of letting it sit and push against the wall face. Saturated backfill can generate roughly two to three times the lateral force of dry soil, which is why most residential retaining wall failures trace back to trapped water rather than a weak wall material.
You’ll see this called a few different things: French drain, drain tile, backfill drainage, or just “the gravel behind the wall.” They all describe the same core idea. Water has to have somewhere to go, and that somewhere needs to be engineered, not accidental.
The system that actually works has four parts working together:
- Drainage stone zone: a band of clean, angular crushed stone directly behind the wall that lets water move freely instead of pooling in clay or silt.
- Perforated drain pipe: a pipe at the base of that stone zone, sloped so gravity carries water to an exit point.
- Filter fabric: geotextile wrapping the stone zone to keep fine soil particles from migrating in and clogging the system.
- Daylighted outlet: the actual exit, where water leaves the system and gets away from the wall and its footing.
Skip one part, and the other three can’t fully compensate. That’s the pattern behind most of the failures contractors get called out to diagnose.
Homeowner Quick Checklist Before You Sign a Contract
Whether you’re getting quotes for a new wall or checking work already in the ground, run through this list. Every item should get a clear yes.
- Drainage stone zone width: at least 12 inches of clean crushed stone behind the wall, wider (18 to 24 inches) for taller walls.
- Drain pipe spec: 4-inch perforated pipe, perforations facing down, sloped at 1% or more toward an outlet.
- Filter fabric: non-woven geotextile wraps the entire stone and pipe zone, not just draped on top.
- Daylighted outlet: pipe actually exits somewhere, visibly, at grade below the drainage zone, not buried or capped.
- Weep holes: present as backup relief, spaced appropriately, but never treated as the only drainage method.
- Surface grading: soil at the top of the wall slopes away from the crest, not toward it.
If a contractor can’t answer specifically how each of these is handled, that’s a red flag worth pressing on. And if you’re dealing with a wall taller than about 4 feet, retaining a slope in clay soil, or sitting near a known high water table, this is the point to bring in a structural or geotechnical engineer rather than relying on a standard installation. Manufacturer guidance from Allan Block backs this escalation point directly for non-granular or migrating-water sites.
Drainage Components Explained: Stone Zone, Pipe, Fabric, and Weep Holes
Each piece of a drainage system solves a different part of the same problem: getting water out before it turns into pressure. Skip one, and you haven’t built a partial system. You’ve built a system that’s likely to fail at its weakest link.
The drainage stone zone is the workhorse. Clean, angular crushed stone, typically graded as #57 stone (roughly 3/4-inch), creates air gaps that water moves through easily. Round pea gravel or crusher run, by contrast, packs tighter and holds fines, which defeats the purpose. The minimum recommended width is at least a foot, though for anything above a modest garden wall, 18 to 24 inches gives real margin, especially in clay-heavy New Hampshire soils where water doesn’t move through native ground on its own.
The number that matters: saturated backfill without proper drainage can push roughly 2 to 3 times the lateral force against a wall compared to properly drained soil. That’s the difference between a wall that lasts decades and one that bulges or topples within a few wet seasons.
The drain pipe sits at the base of the stone zone, doing the actual transport work. Best practice calls for 4-inch perforated pipe installed with perforations oriented to allow water entry, which sounds counterintuitive until you realize water enters through the bottom perforations after moving down through the stone, then flows out through the solid top of the pipe interior. The pipe needs a minimum slope of about 1 percent to ensure positive drainage, to keep water moving toward the outlet instead of sitting stagnant.
PVC and corrugated HDPE both show up in real installations, and each has a real trade-off:
- Rigid PVC: smoother interior, easier to snake or camera-inspect later, longer service life, but costs more and is less forgiving around bends.
- Corrugated HDPE: flexible, cheaper, faster to install around curves, but the ridged interior can trap sediment over time and makes future cleaning harder.
Weep holes are small openings through the wall face itself, usually spaced every few feet, that let water escape directly rather than traveling the full length of the drain pipe. They’re a useful secondary relief valve. What they are not is a substitute for the stone and pipe system. Weep holes installed into a wall with no drainage zone behind them tend to clog with fines almost immediately and often fail to actually solve a wet-wall problem on their own. If a contractor tells you weep holes are the whole plan, that’s worth a second opinion.
How to Choose Pipe, Stone, Fabric, and Accessories
The materials list for a drainage system is short, but each choice affects how long the system keeps working without maintenance. Cheaper substitutions upfront often mean an excavation project in five years.
Pipe: For a wall you expect to own for decades, or where you’ll want to run a camera or snake down the line someday, rigid PVC is worth the extra cost. DIY installs and shorter-term projects often use corrugated HDPE instead, trading some long-term cleanability for lower material cost and easier handling on uneven ground. Neither choice is wrong. It depends on how much you value future access to the line.
Stone: This is not the place to use whatever gravel is cheapest at the yard. Pea gravel is rounded and compacts into a denser mass than you’d expect, which slows water movement. Crusher run contains a mix of particle sizes, including fine dust, that clogs the voids a drainage zone depends on. Clean #57 crushed stone, angular and consistently sized, stays open and lets water pass through freely for the life of the wall.
Filter fabric: Use a non-woven geotextile rated specifically for drainage applications, not the woven landscape fabric sold for weed control under mulch beds. The two look similar on a shelf and behave completely differently underground. Drainage-rated fabric lets water pass while blocking soil fines; woven landscape fabric can restrict flow and defeats the point of the stone zone.
A few accessories round out a well-built system:
- Filter socks (fabric sleeves wrapped directly around the pipe) add a second layer of fine-particle protection, useful in silty soils, though they’re not a replacement for wrapping the full stone zone.
- Pop-up emitters at the outlet keep the pipe end from filling with leaves and debris while still letting water discharge freely.
- Rodent screens at the outlet keep small animals from nesting inside the pipe, a surprisingly common cause of blocked systems.
- Outlet armor (a small stone apron or splash block) prevents erosion right where the water exits.
How to Install Drainage Behind a New Retaining Wall
Building the drainage system correctly happens in a specific sequence, and skipping steps out of order is where a lot of DIY and even some professional installs go wrong. Here’s the sequence that holds up.
-
Excavate behind the wall with adequate set-back. Dig a trench behind the wall face wide enough for your target stone zone, generally 12 inches minimum and up to 24 inches for taller walls. Don’t crowd the excavation right against the wall units; give the stone room to do its job.
-
Line the trench with filter fabric. Lay non-woven geotextile so it covers the base and both sides of the trench, with enough excess fabric on each side to fold over the top of the stone once it’s placed. This wrap is what keeps native soil from migrating into the drainage zone over the years.
-
Place a bedding layer of stone. Put down 2 to 3 inches of clean #57 crushed stone as a base before setting the pipe. This keeps the pipe from resting directly on soil and gives it a stable, well-draining cradle.
-
Set the perforated pipe with perforations down. Lay 4-inch perforated pipe on the bedding stone, confirming the perforations face downward so water enters from below after filtering through the stone. Check slope with a level or string line; you need a minimum gradient around 1 percent, and steeper is fine, running continuously toward your planned outlet. Avoid low spots or reverse pitches, which create standing water pockets that eventually clog.
-
Backfill around and above the pipe with stone. Continue filling the trench with crushed stone up to within roughly a foot of finished grade, covering the pipe completely. This is the working drainage zone, and it needs to stay clean, angular stone all the way up, not a mix of native soil and gravel.
-
Fold the fabric over the top of the stone. Wrap the excess geotextile from the trench liner over the top of the stone before adding topsoil. This seals the drainage zone into a fabric-wrapped sleeve that keeps fines out from every direction, not just the sides.
-
Route the outlet to daylight, a dry well, or storm drainage. The pipe has to end somewhere useful. Daylighting, having the pipe exit at a lower point on the slope where water can flow away visibly, is the simplest and most inspectable option. A dry well works where daylighting isn’t possible due to grade. Tying into a municipal storm system requires local approval and is less common for residential walls. Whatever the destination, protect the outlet with a rodent screen and stone apron so it doesn’t silt in or get blocked by debris.
-
Finish grading and compact the topsoil layer. Add the final few inches of topsoil above the fabric-wrapped stone, sloping it away from the wall crest at a gentle grade so surface water doesn’t reintroduce itself into the drainage zone from above. Light compaction here helps prevent settling that could create a low spot.
-
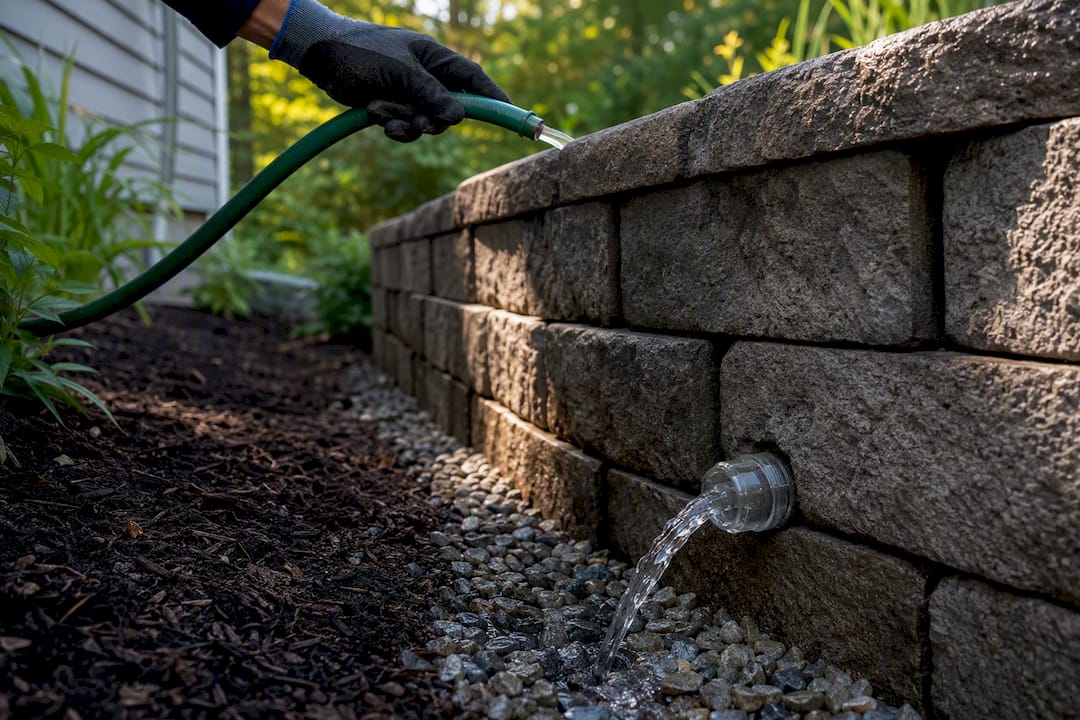
Run a hose test before calling the job done. Introduce water at the top of the drainage zone and watch the outlet. On a properly sloped, unobstructed system, you should see visible flow at the daylighted outlet within about 60 seconds. No flow, or a long delay, points to a blockage, a reverse pitch, or a disconnected pipe somewhere in the run, and it’s much cheaper to find that now than after the wall is backfilled and finished.
For long wall runs, Allan Block’s technical guidance recommends adding venting points or additional outlets roughly every 50 feet, which prevents water from pooling mid-run even on a wall with correct overall slope.
Managing Surface Water Above the Wall
A perfect subsurface drainage system can still lose to surface water if grading above the wall sends rain straight into the backfill. This is the piece homeowners overlook most often because it’s invisible once the lawn grows back in.
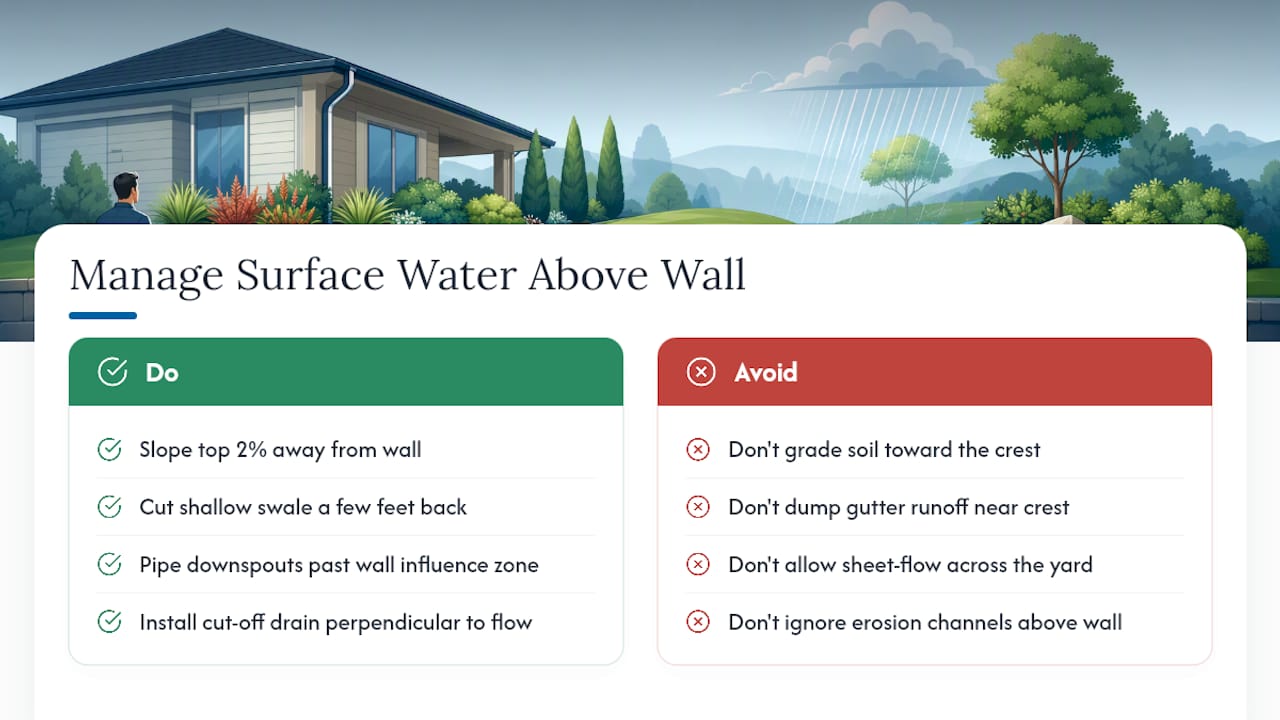
The soil at the top of a retaining wall should slope away from the crest, not toward it. Even a gentle grade, roughly 2% falling away from the wall, keeps rainfall moving toward a lawn or swale instead of soaking straight down into the retained fill. A small swale, essentially a shallow, grassed channel, cut a few feet back from the crest can intercept water running downhill before it ever reaches the wall’s backfill zone.
Downspouts deserve specific attention. A gutter that dumps roof runoff a few feet from a wall’s crest is effectively injecting a concentrated water source right where you don’t want it. Piping downspout discharge in closed pipe well past the wall’s influence zone, rather than letting it sheet-flow across the yard, removes one of the most common uncontrolled water sources homeowners create without realizing it. If storm intensity in your area is a recurring concern, guidance on managing roof runoff in storm-prone regions covers the broader picture of keeping concentrated water away from foundations and walls alike.
For sites with a driveway, patio, or slope feeding water toward the wall from above, a cut-off drain, essentially a trench drain or French drain running perpendicular to the water’s path, intercepts flow before it ever reaches the backfill. This is worth adding any time you notice erosion channels or standing water forming above a wall after storms.
Retrofitting Existing Walls Without Undermining Them
A wall showing early signs of trouble, a slight bulge, damp staining, or water seeping out low on the face, doesn’t automatically need to come down. Retrofitting drainage into an existing structure is often possible, but the approach depends heavily on how the wall was originally built.
Start by assessing feasibility. If the wall is masonry or block with visible mortar joints or coursing, a retrofit stands a reasonable chance of helping. If you see active leaning, cracking through structural units, or a wall that’s already shifted more than an inch or two out of plane, that’s a signal to bring in a structural engineer before doing anything else. Retrofitting drainage into a wall that’s already structurally compromised can accelerate a collapse rather than prevent one.
Where retrofit makes sense, three approaches come up most often:
-
Core-drilled weep holes. Drilling new weep holes through the wall face at the base gives trapped water a path out. This is the least invasive option, but it works far better when at least some gravel or granular material already exists behind the wall. Weep holes drilled into a wall with no drainage zone behind it tend to underperform, since there’s nothing directing water toward the new opening.
-
Trenched toe drain. Excavating a narrow trench along the base of the wall and installing a new perforated pipe wrapped in fabric and stone gives you something closer to a proper drainage zone without removing the whole wall. This requires care: contractors often use temporary shoring or buttressing to keep the wall stable while the base is exposed during excavation.
-
Surface cut-off drains. For walls where excavation behind the structure isn’t practical, adding a cut-off drain or swale at the top can meaningfully reduce the water reaching the backfill in the first place, even without touching the wall itself.
Pro Tip: If a wall has been fine for years and only recently started showing dampness after a specific change nearby, a new patio, a regraded flower bed, a downspout moved closer, check that change first. Sometimes the fix is redirecting one water source rather than rebuilding a drainage system that was working fine before.
Common Drainage Mistakes and How to Avoid Them
Most drainage failures aren’t caused by exotic problems. They’re caused by a handful of repeated shortcuts that are easy to catch if you know what to look for.
- Skipping the filter fabric. Saves a little money upfront, but the stone zone silts up with fine soil particles within a few seasons, and once that happens, you’re excavating to fix it.
- Using the wrong stone. Pea gravel or crusher run in place of clean crushed stone is one of the most common installation mistakes and quietly defeats the drainage zone’s whole purpose.
- Flat or backward pipe pitch. A pipe installed without checking slope, or accidentally pitched the wrong direction during backfilling, creates standing water instead of flow. Always verify slope with a level before covering the pipe.
- Dead-ended outlets. A pipe that terminates underground with no actual exit point is a drainage system with nowhere for water to go. Confirm the outlet daylights somewhere visible and unobstructed.
- Over-relying on weep holes alone. They help, but without a stone and pipe system behind them, they’re treating the symptom rather than the cause.
- Burying the outlet in mulch or landscaping. An outlet that’s been mulched over or landscaped shut still exists, but it’s not doing anything. Check outlets are visible and clear at least twice a year.
If you spot standing water, a musty smell near the wall base, or efflorescence (white mineral staining) after checking these items, that combination usually points to a drainage problem serious enough to bring in a professional for a proper look.
Seasonal Maintenance and Inspection Checklist
A well-built drainage system needs very little upkeep, but a few minutes of seasonal attention keeps it working for decades instead of years.
- Clear outlets of debris, leaves, mulch, sediment, at least once each spring and fall.
- Run a hose test at the top of the drainage zone once a year and confirm flow appears at the outlet within roughly a minute.
- Check the base of the wall for staining, dampness, or soft ground, which can indicate the drainage zone is no longer moving water efficiently.
- Clean pop-up emitters or rodent screens if flow seems reduced; these small parts clog before the pipe itself usually does.
Pro Tip: Keep a phone photo of your outlet location and what “normal flow” looks like during a hose test. Comparing against that photo next year makes it easy to spot a slowdown before it becomes a real problem.
If a hose test shows no flow, or flow that’s clearly weaker than in past years, and clearing visible debris doesn’t fix it, that usually means a blockage further down the pipe. That’s a job for camera inspection or partial excavation rather than more guesswork from the surface.
What We See in the Field at Divine Landscaping
On every retaining wall project, a thorough set of physical checks helps ensure the system matches the design. That means confirming the outlet daylights somewhere visible, probing behind the first course of block by hand to feel for stone versus native soil, and watching the outlet directly during a hose test rather than just checking a box on a punch list.
New Hampshire’s mixed soils make this extra important. Frost heave cycles and pockets of dense clay show up in yards that otherwise look like straightforward sandy loam, and a drainage system sized for “typical” soil can underperform the moment it hits one of those pockets. Best practice on sites with uncertain soil conditions is to overbuild the drainage zone rather than build to the bare minimum, adding wider stone bands, extra outlet points, or a chimney drain tying into the main system.
Why Drainage Comes Before Anything Else on a Wall Project
Drainage is the cheapest insurance you’ll ever buy for a retaining wall, and it’s the one corner that’s hardest to fix after the fact. Once a wall is backfilled, capped, and landscaped, correcting a missing stone zone or an under-pitched pipe means undoing most of that work. Spending the extra money on 18 inches of clean stone instead of 12, or on a second outlet for a long run, costs a fraction of what a rebuild costs five years later.
That said, not every check requires a professional. Homeowners can absolutely run the hose test on an existing wall, look for visible outlets, and check for staining at the base themselves; it’s covered in the checklist above. Where it makes sense to bring in a professional is when a wall is already showing movement, when you’re planning a wall over 4 feet, or when your soil is the kind of clay that turns to soup every spring. At that point, the cost of getting a professional opinion is far lower than the cost of guessing wrong.
— Damian
How Drainage Is Handled, From Inspection to Full Installation
Some companies offer services for New Hampshire and Massachusetts property owners who want a properly built drainage system done right the first time rather than troubleshoot failing walls later. Such hardscape work can cover new retaining wall installs with full drainage systems, retrofit drainage on existing walls showing early trouble, and straightforward inspections for homeowners seeking a professional opinion before or after a project.

If you’re getting quotes right now, bring the checklist from this guide with you. Ask any contractor directly about stone zone width, pipe slope, fabric type, and where the outlet daylights. A contractor who answers those questions specifically, rather than in generalities, is one worth trusting with the work. Our hardscape services page covers what a full retaining wall project looks like from design through installation, and our retaining wall contractor page has details on scheduling a site visit. If you’re still deciding whether your yard even needs a wall, our guide on what a retaining wall actually does is a good starting point before you request a quote.
Sources
The specifications and installation steps in this guide draw on manufacturer and industry technical resources rather than general advice. Homeowners and contractors verifying details on their own project can check these directly:
- Retaining Wall Drainage: Prevent 80% of Wall Failures
- Proper Water Management — Allan Block technical document
- Retaining Wall Drainage Pipe: How to Install
- Adding drainage to your retaining wall — Family Handyman