
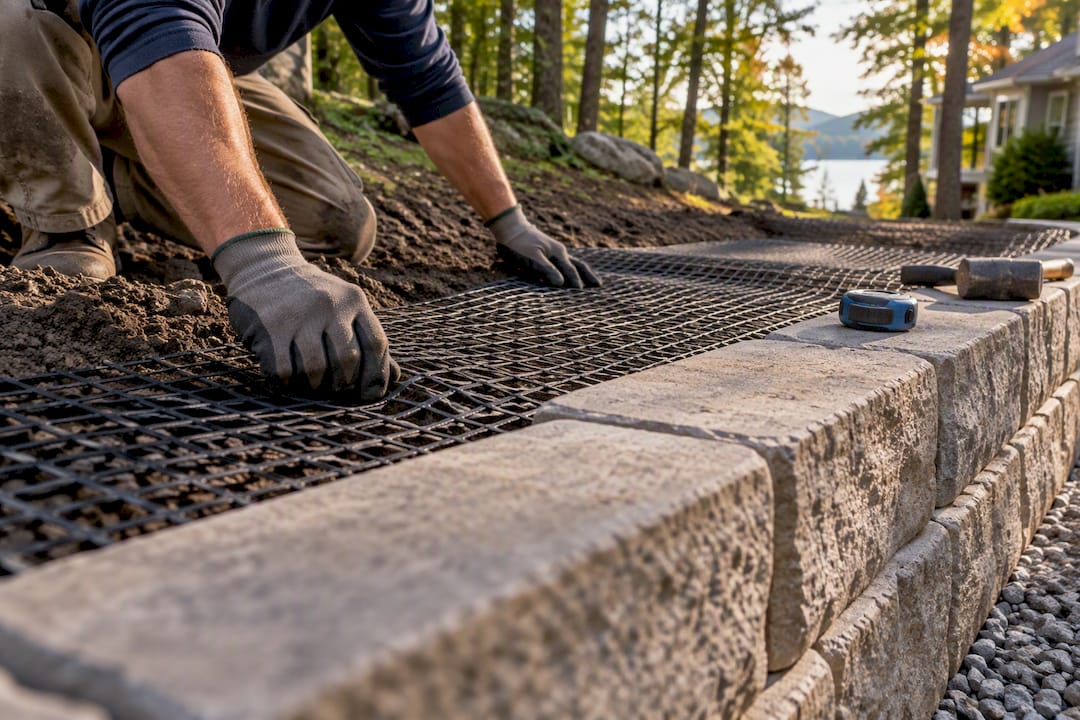
For most segmental retaining walls taller than roughly human-scale low height, geogrid reinforcement is generally required to prevent hinge-zone failure. The rule that matters most: embed each grid layer at least 0.6 times the wall height (0.75 times if there’s a driveway or slope above), with a minimum length typical for practical reinforcement, and always place a layer near the base to protect the hinge zone. For anything beyond a simple garden wall, get an engineer to confirm your soil and surcharge conditions before you dig.
TL;DR:
- Geogrid reinforcement is essential for retaining walls taller than 4 feet, especially if there is a surcharge, slope, or poor drainage conditions.
- Proper installation requires embedding at least 0.6 times the wall height with a grid layer near the base to prevent hinge-zone failure.
- Use uniaxial geogrid rated for long-term strength, and verify LTDS values are provided, as they determine the wall’s durability over decades.
- For walls over 4 feet or with any surcharge or rising slope, site evaluation and engineered design are strongly recommended.
- Common mistakes include insufficient embedment length, incorrect grid orientation, shallow backfill lifts, or failing to reinforce the hinge zone properly.
Table of Contents
- What Is Retaining Wall Geogrid and When Do You Need It?
- Uniaxial vs. Biaxial: Which Geogrid Type Fits a Wall?
- What Do UTS and LTDS Mean on a Geogrid Spec Sheet?
- How Do You Install Geogrid Correctly the First Time?
- What a Contractor Checks Before Recommending a Design
- What I’d Tell a Homeowner Standing in Their Backyard
- Get an Engineered Retaining Wall Built Right the First Time
- Sources
- FAQ
What Is Retaining Wall Geogrid and When Do You Need It?
Geogrid is a grid-like geosynthetic sheet, usually made from high-density polyethylene (HDPE) or polyester, that gets buried in compacted backfill behind a retaining wall. It works as tensile reinforcement: the soil grips the grid’s ribs and apertures, and the two act as one composite mass capable of resisting lateral pressure the wall face alone couldn’t handle. Engineers call this a mechanically stabilized earth (MSE) system, and it’s the same principle behind highway embankments and bridge abutments scaled down to your backyard.
You don’t need geogrid for every wall. But several conditions push a wall from “optional” to “required”:
- Wall height exceeds 4 feet, measured from the base to the top of the finished grade.
- There’s a surcharge above the wall, like a driveway, patio, or structure adding load.
- Backfill is weak or cohesive (clay-heavy soils that don’t compact into a stable, free-draining mass).
- There’s a slope rising above the wall’s crest, which adds pressure the wall wasn’t designed for.
- Drainage is poor, since saturated soil behind a wall weighs dramatically more and pushes harder.
The most overlooked risk is the hinge zone, the bottom third of the wall where lateral pressure concentrates. Skip reinforcement there, or start your first grid layer too high off the footing, and you’ve built a wall that looks fine for a season or two before it starts to lean, bulge, or rotate outward.
Uniaxial vs. Biaxial: Which Geogrid Type Fits a Wall?
Retaining walls need uniaxial geogrid, not the biaxial or triaxial grids you’ll see marketed for driveways and parking lots. The difference comes down to load direction. A wall pushes soil in one dominant direction, straight out toward the face, so uniaxial grids are engineered with their strong axis running that way. Biaxial and triaxial grids distribute load in multiple directions at once, which suits pavement base stabilization but leaves them underbuilt for the concentrated pull a wall generates.
Material choice matters just as much as grid pattern:
- HDPE grids resist chemical exposure and alkaline soils well but are more prone to long-term creep under sustained load.
- Polyester grids generally offer higher stiffness and lower creep, making them a common choice for taller, load-bearing walls.
- Composite grids combine reinforcement with a built-in filtration layer, which can simplify drainage design behind the wall.
The practical takeaway: buy a uniaxial geogrid rated for long-term design strength and matched to your facing system, whether that’s segmental block, natural stone, or a poured system. If your supplier can’t tell you which axis carries the load, that’s a red flag.
What Do UTS and LTDS Mean on a Geogrid Spec Sheet?
Supplier data sheets love to lead with ultimate tensile strength (UTS), the load a grid sample fails at in a lab. That number is not what you design a wall around. Engineers use long-term design strength (LTDS) instead, which applies reduction factors for installation damage, long-term creep, and chemical or biological aging over the wall’s service life.
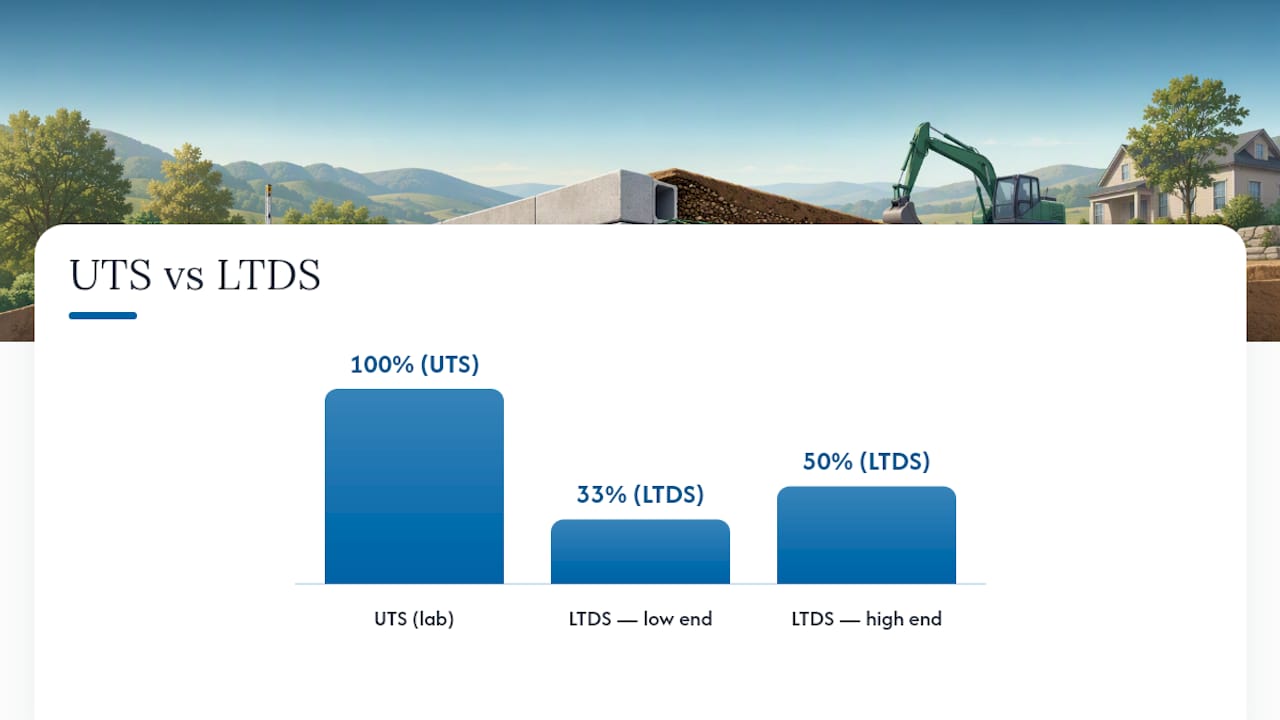
Pro Tip: If a supplier only hands you a UTS number with no reduction factors listed, ask directly for the LTDS or walk away. A grid that tests strong in a lab can lose a third to half its strength once those factors are applied.
LTDS typically lands somewhere between 33% and 50% of the quoted UTS, depending on the polymer and installation conditions, based on reduction-factor guidance widely used in wall design. That gap is the difference between a wall that holds for decades and one that creeps out of plumb within a few years.
When comparing products, check the datasheet for these references:
- ASTM D6637, the standard test method for geogrid tensile properties.
- GRI-GG4, the geosynthetic institute’s method for determining long-term design strength.
- FHWA-NHI design manuals, which most state departments of transportation build their specifications around.
- NCMA’s Segmental Retaining Wall Manual, the reference most residential and commercial segmental wall designs follow.
For a typical residential wall between 4 and 8 feet, expect to need LTDS values in the low thousands of pounds per foot, but that range shifts fast with soil type and surcharge. If your supplier can’t produce reduction factors or a tested LTDS, treat that as a sign to bring in an engineer rather than guess.
How Do You Install Geogrid Correctly the First Time?
Installation is where most DIY walls succeed or fail, and the mistakes are almost always the same handful of errors repeated wall after wall.
- Calculate embedment length first. Minimum grid length is the greater of 4 feet or 0.6 times wall height for walls with no surcharge, rising to 0.75 times wall height when there’s a driveway, structure, or slope above, measured from the back of the facing units.
- Set vertical spacing based on soil. Layers typically land every 16 to 24 inches depending on backfill friction angle. Place the first layer at or near the base course to protect the hinge zone.
- Orient the strong axis correctly. The grid’s high-strength direction runs perpendicular to the wall face. Laying it the wrong way is a common and costly mistake that’s invisible until the wall starts moving.
- Use continuous runs, not short splices. Overlapping or splicing grid parallel to the face weakens the reinforced mass right where you need continuity most.
- Backfill with clean, granular material in lifts no thicker than about 8 inches, hand-compacting the zone closest to the wall and keeping heavy equipment outside the consolidation zone to avoid pushing the facing out of alignment.
- Add drainage and filter layers behind the reinforced mass so fines don’t migrate through the backfill and clog your drainage system over time. Our guide on retaining wall drainage checks covers this in more detail.
The most common failures we see: grid placed only near the top of the wall, embedment cut short to save material, backfill compacted with equipment too heavy for the zone behind the wall, and grids laid with the weak axis facing the wall. Any one of these can turn a wall that should last generations into one that needs rebuilding within five years.
What a Contractor Checks Before Recommending a Design
Before recommending a standard spec build versus an engineered design, we walk the site and check a specific set of conditions:
- Slope grade above and below the proposed wall line.
- Visible water, seepage, or drainage patterns during and after rain.
- Proximity to structures, property lines, septic systems, or utilities.
- Access for compaction equipment and material delivery staging.
Walls over 4 feet, walls carrying a surcharge, or walls on clay-heavy or previously disturbed soil almost always get an engineered spec rather than a standard build. Coordination matters as much as materials: delivery timing, compaction sequencing, and drainage installation all need to happen in the right order, or you end up reworking finished sections. Our material options guide covers how geogrid integrates with common facing systems if you’re still deciding on materials.
What I’d Tell a Homeowner Standing in Their Backyard
Most retaining wall failures I’ve seen written up trace back to skipped embedment length or a missing hinge-zone layer, not exotic engineering problems. If your wall is under 4 feet with no surcharge and decent soil, a careful DIY check of drainage and backfill might be enough. Anything taller, sloped above, or loaded with a driveway deserves an actual site evaluation before you break ground.
— Damian
Get an Engineered Retaining Wall Built Right the First Time
Reading embedment formulas is one thing. Compacting backfill correctly behind a 6 foot wall on a rainy October weekend is another. We handle the site evaluation, soil assessment, and engineered geogrid specification so you’re not the one guessing at LTDS numbers or hoping your compaction lifts were thin enough.

We build and repair walls, from simple garden borders to tall, surcharge-loaded walls that need an engineered design. If your project involves a wall over 4 feet, a slope above the crest, or a driveway bearing down on the backfill, professional site evaluation can be very beneficial. Browse our retaining wall and hardscape services or check our project gallery to see completed work, then request a quote to get your site evaluated before you order a single yard of backfill.
Sources
For deeper sizing detail, use the geogrid retaining wall calculator for rough embedment and spacing math, Tensar’s technical guide for how MSE systems function, and Allan Block’s specification guidelines for compaction and placement standards.
- Retaining Wall Geogrid Calculator: Spacing, Length & Layers
- Geogrid Retaining Wall: Design & Uniaxial Geogrid Guide
- Specification Guidelines: Geogrid Reinforcement Systems
FAQ
Do I Need Geogrid for a 4 ft Retaining Wall?
A wall right at 4 feet is the threshold where most designers start requiring geogrid, especially if there’s any surcharge, slope above the crest, or clay-heavy soil. Below 4 feet with good drainage and clean backfill, many standard segmental walls can stand without reinforcement, but confirming with your local building code or an engineer removes the guesswork.
When Should You Use Geogrid on a Retaining Wall?
Use geogrid whenever the wall exceeds about 4 feet, carries a surcharge like a driveway or patio, sits below a rising slope, or is built on weak or cohesive soil. The hinge zone in the bottom third of the wall is the area most likely to fail without reinforcement, so at least one grid layer belongs there regardless of overall height.
What Is Geogrid Used for in Retaining Walls?
Geogrid reinforces the compacted soil behind a wall so the soil and grid act as one mechanically stabilized mass capable of resisting lateral earth pressure. This lets walls stand taller and steeper than an unreinforced gravity wall of the same materials, and it’s why MSE wall systems have largely replaced older concrete gravity designs for taller residential and commercial walls.
How Much Geogrid Do I Need for a Retaining Wall?
Minimum embedment length equals the greater of 4 feet or 0.6 times your wall height with no surcharge, rising to 0.75 times wall height when a driveway or slope adds load, measured from the back of the wall facing. Vertical spacing between layers typically runs 16 to 24 inches, and running the numbers through a sizing calculator before ordering material avoids costly underestimates.
Does Divine Landscaping LLC Install Geogrid-Reinforced Walls?
Yes, Divine Landscaping LLC designs and builds geogrid-reinforced retaining walls as part of its masonry and hardscape services, including site evaluation, drainage planning, and engineered specification for taller or surcharge-loaded walls. Pricing depends on wall height, soil conditions, and materials, and current details are available by requesting a quote on the site.